How To Take Great
Home Staging Photos

Home Staging is all about first impressions; the prolonged online view, the first glance at the end of a driveway, and the immediate, emotional response upon entering a home.
USC™ Home Stagers create this imprint by maximizing the positives and minimizing the negatives of any home, using skills, education, and experience. First impressions establish a connection, creating an invisible tether that, in this case, draws visitors towards their potential new home.
The entire industry, in fact, is built on first impressions, which includes crucial marketing strategies. With such a visual product, home stagers rely on their own home staging photos to make an immediate connection with clients, propelling a home staging company towards success. So, how can you take great home staging photos?
Making a Great First Impression
To generate business, home staging, decorating, and professional organizing photos—whether on a website, social media, or in a portfolio—need to make a great first impression. These photos tell your story; they showcase your talent and communicate your skills, both as a Home Stager, a Decorator & ReDesigner, a Professional Organizer, and as a photographer.
These industries are built on appearances; in home staging, it’s about how a home looks and how it makes potential buyers feel. Home Staging photos are no different; by maximizing the positives and minimizing the negatives, USC™ Home Stagers can enhance the look and feel of them, even before the photos are taken.
Before the Photo is Taken
Each staging, decorating, or organizing photo offers an opportunity to present your work to potential clients. They must showcase how you use colors, patterns, textures, and furniture arrangement to create a warm, welcoming home.
Each photo requires careful planning regarding shooting position, composition, lighting, and depth.
Shooting Position:
The position from which you shoot a photo impacts the viewer’s perspective. While standing might seem to offer the best result by creating a photo at eye level, it often yields an image that feels too high and unnatural.
A better position is to kneel or squat while shooting, to find a more realistic, eye-level perspective for the viewer.
Composition:
Composition is how the elements of a photo are arranged. Each detail within a frame tells a story when taken together. Consider what story you wish the room to tell. Walk around the space to identify the focal point, showcasing your skills as a Home Stager.
Unlike real estate listing photos, home staging portfolio photos should focus on showcasing your talent for creating a feeling of home, using methods like The Rule of Thirds to create balanced, compelling photos.
Lighting:
Good lighting is essential; poor lighting is immediately noticeable. Lighting depends on the time of day and the angle of your shot. Experiment with various positions and lighting options to find what works best. Shadows, while they can add depth, should generally be avoided to prevent dark or hidden spots in the frame.
Utilize camera settings, such as Smart HDR on iPhones, to balance exposures between your subject and background.

In this photo, the rocks and mud comprise the foreground, the water ripples in the middle ground, and the mountains stand majestically in the background. The three layers of the photo capture the depth of the landscape, and as they are connected, they pull the viewer’s eye through the photo.

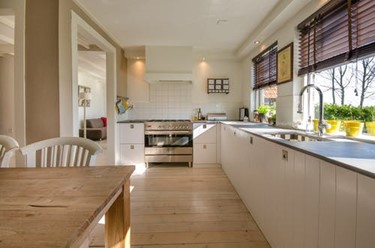
In this photo, the table is presented in the foreground, the stove rests in the middle ground, and the family room is observed in the background. Including the three layers creates depth and pulls the viewer’s eye through the photo.
Visual cues in each frame, detail the home’s characteristics. Without captions, the viewer can sense the warmth of the home, assess the amount of natural light, and evaluate its layout. With one photo, you have begun to tell the story of this sunlight-filled home.
Perspective can also create depth in a photo. Lines that disappear towards the horizon once again, draw the viewer’s eye through the photo. The lines also act as a directional feature; they point the way to the primary subject.

This photo captures two types of directional features. The line down the middle of the road points the viewer’s eye toward the primary subject. The two converging lines on the outside of the road creates depth.

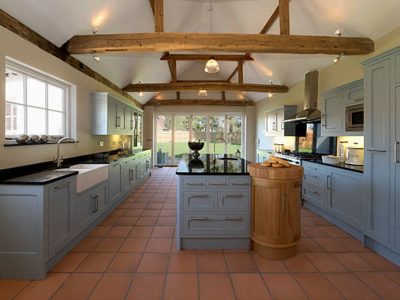
Taking the picture from this perspective in the kitchen, utilizes the lines on the floor. As they converge in the distance, they create depth. They also point the viewer’s eye towards the primary subject: the window and the incredible view it offers to the homeowners. The visual cues presented in this photo tell the story of a large, spacious home, complete with rustic features and a magnificent view.
USC™ Home Stagers, UDRC™ Decorators and UCPO™ Professional Organizers rely on showcasing their work through photos to generate business and build their brand. Like the first impression of a home-for-sale, these photos must create an instant connection with potential clients.
Learning how to take advantage of shooting position, composition, lighting, and depth, will help you to produce visually compelling photos. With practice and experience, your photos can tell the story of you and your successful company.

Learn About our Home Staging Certification


